Introduction to Docker
Generally, in the first paragraph of a guide, I lay the groundwork with an official definition of the subject in question and, taking that as a starting point, begin to explain how things work. The problem here with Docker is, even the official definition is pretty intimidating. For instance, here are some snippets from its Wikipedia page:
Docker is a computer program that performs operating-system-level virtualization also known as containerization. Docker is used to run software packages called "containers." All containers are run by a single operating system kernel and are thus more lightweight than virtual machines. Containers are created from "images" that specify their precise contents. Images are often created by combining and modifying standard images downloaded from repositories.
Clear as a bell, no? Umm, not really. So I’ll try an explain things from a practical point of view. Docker allows us to easily write whatever we want, and to run it wherever we want. For example, say I want to write some PHP, but I’m on Windows—no problem. And if I want to write some Node.js but don’t feel like mucking up my local operating system with nvm—no problem there either. If I want to develop on WordPress but I don’t feel like installing PHP and MySQL and I’m working on Windows—still it’s no problem. And more so, Docker allows an entire team to run on the same environment. So instead of checking to make sure everyone is on the same version of MySQL or the same version of PHP, or the same version of Linux, we can easily enforce the use of the same environment for all of the developers on a project.
All this without using a virtual machine (even though there’s one in the background), without messing around with settings, and without a big headache. Just a simple installation, run a few lines in a file, and we’re ready to run whatever we want. In this article, I’ll explain a little about Docker and show how to run PHP inside Windows.
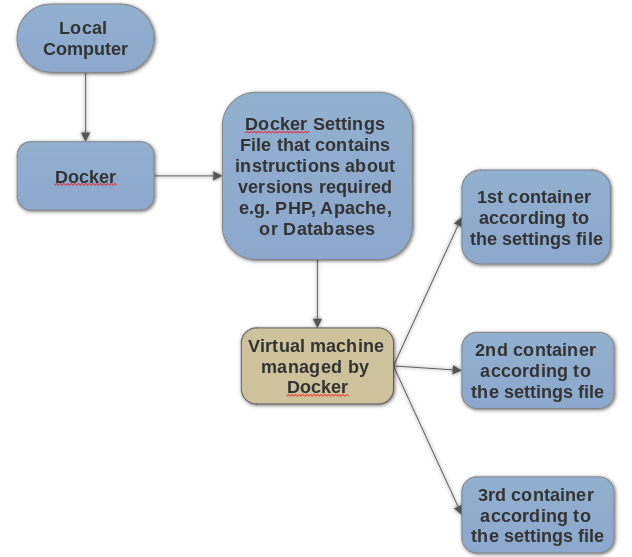
You know what? Let’s get down to brass tacks here. I’ll install Docker and then create a container. What’s a container you ask? It’s a machine that runs everything we need. For instance, Apache and PHP, or maybe Node.js and Linux. All of the machines are Linux based, and each container is set by a settings file. For example, in the settings file it’s written that we need PHP version 7 and Apache version 2.1. Docker takes the settings and makes a container—a virtual machine that has just what we want in it and is already set up with a file system that’s interfaced with us, its own port, and more. And it’s done quickly and easily.

So, Docker can take a settings file and copy it quite quickly to a machine or machines that are called containers, but really, are no different than virtual machines. But a container starts up in seconds while a virtual machine is much slower. Containers are easily set using the settings file while virtual machines are not.
The first stage is setting up Docker.
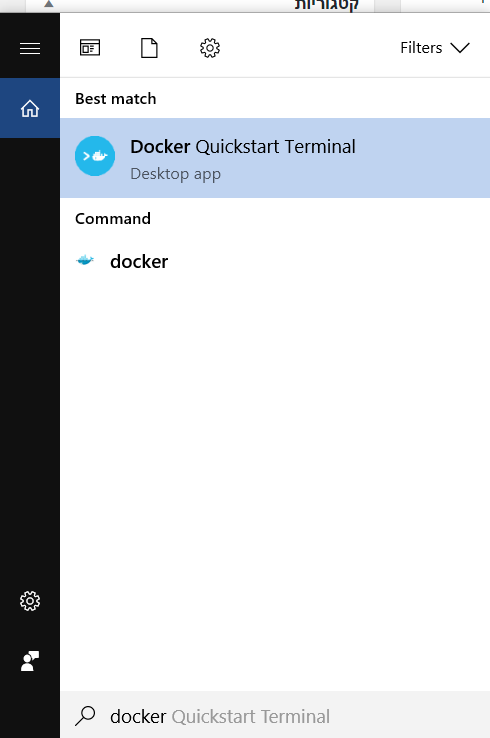
Installing the Docker Toolbox is very easy on Mac or Windows. Just go over to the docker toolbox site, download, and install. If you’re on a home network with a proxy, you still shouldn’t have a problem. How do we know that the installation worked? Search for docker quickstart Terminal in the Windows search box and run.

Here we get to a kind of CMD that allows us to run Linux commands on Windows like cygwin, for those who know. It’s called docker shell and its unique to Windows and Mac. In order to check that everything is working OK, type the following command:
docker -v
This will show me the version of Docker, if everything’s OK. You can also run:
docker ps -a
This shows us the list of all of the existing Docker machines. At this point that will be an empty list. If there’s a problem at this point, stop and try to fix it. The quick fix is to reinstall the latest version of docker tools. If you’re using a virtual machine, try typing Virtual box and run the docker shell again. It should be OK. Here, like so:

So now what? Now it’s time to make the settings file. Really, Docker is a mechanism for running virtual machines. So, we have a virtual machine, just like virtual box if you’ve ever run something like that, and on top of it sits Docker. We manage the interaction with the virtual machine using Docker commands and the settings file. When Docker installs or uses the virtual machine according to its settings, we can operate Docker in a few ways:
- Create a special settings file for our application in which we define which environment, database, language etc. that we want
- Use an existing default file from the Docker databases
We’ll go with option 2 here, and save creating our own settings file for a future article. Docker has a huge database of default files, and a few of them are thought of as official. PHP has an official Docker file which we’ll use here. It contains a huge amount of links to all kinds of PHP environments. We need the one that supports Apache since we need a web server to go with PHP. The name of the package is php:7.0-apache.
In order to install our first Docker file, we’ll need to use docker run. It’s a powerful command that takes a Docker file and turns it into a Docker container.
docker run -d -p 80:80 --name my-apache-php-app -v "$PWD":/var/www/html php:7.0-apacheLet’s go over this command piece by piece. First we have docker run, which takes the settings file and turns it into a container—that is to say, into a real machine that will contain our application.
The -d flag allows the machine to be separate from our cmd and it’s generally a good idea to put this flag. We can access the container afterward.
The -p flag sets the port, or more specifically, what comes after the port. 80:80 means that all requests addressed to port 80 of Docker passes to port 80 of the container. We can write something like this for instance:
-p 3000:80
Now, when we write Docker’s IP we need to add 3000. We use this if we’re running several containers at the same time. And yes, this does indeed happen.
The -name flag gives a name to the machine. Each machine gets an ID based on hash, just like in Git for instance. Since this isn’t so nice to work with, you can set an additional name that’s a bit more humanly readable.
The -v flag connects the local computer’s file system to that of the container. Here too the value is my path’s address compared to that of the container’s. In this case, I’m using an environmental variable that points to my documents. But, we can also do something like this:
docker run -d -p 80:80 --name my-apache-php-app -v /c/temp:/var/www/html php:7.0-apacheThe last, and most important part of the package, in our case is php:7.0-apache.
Running this will, via the Docker file, start the installation of all what we need: PHP, Apache, etc. How is it installed? On the local computer?!? Of course not, c’mon. It creates a sort of virtual system. The installation will take a few seconds (depending on your speed) because Docker will download everything. This download is a one-time thing and if you want to create an additional machine, Docker will use what’s already there. Right after running, we’ll get the machine. If we run:
docker ps -a
we’ll see our machine. How do we access it? We need the IP that Docker connected to. That’s not the computers IP but rather that of the virtual machine that Docker is on. To find it, run:
docker-machine ip
If you type this IP together with the port (if you didn’t choose port 80) you’ll see Forbidden. Set index.php in the C:\Users\YOURUSER path, or the path you chose using -v, and see how it’s running just like in the examples.
| Next article: Docker Conatiners |
About the author: Ran Bar-Zik is an experienced web developer whose personal blog, Internet Israel, features articles and guides on Node.js, MongoDB, Git, SASS, jQuery, HTML 5, MySQL, and more. Translation of the original article by Aaron Raizen.
Recent Stories
Top DiscoverSDK Experts


Compare Products
Select up to three two products to compare by clicking on the compare icon () of each product.
{{compareToolModel.Error}}


{{CommentsModel.TotalCount}} Comments
Your Comment