Working with Docker Compose
In the previous articles in our series on Docker, we covered the basics of working with Docker—the number one container platform for the web and in general. If you’re not already in the loop, with Docker I can create any kind of development environment that I want from any computer, with minimal effort. If I messed something up? No problem—I can just restart it.
The problems only really start to arise when I need several containers at once. Why would I need this? Imagine that you need to build a WordPress site that needs a PHP server and a server that has MySQL as well. Or for instance, you need to test an SQL file that you received. You need PHPMyAdmin, which is a GUI for MySQL, and of course a server with SQL. What to do?
Well, you can bust your hump and open two separate containers, but in the end, Docker is all about simplicity and you don’t want to break a sweat with complicated instructions for setting things up each time you want to make a new environment. That goes even for when you need something with multiple containers.
Luckily, there is a solution—docker compose file. The docker compose file is a .yaml settings file—it’s short and sweet and can be run in one line of code.
It goes a little like this: we make a file called docker-compose.yml and put it into any ol’ folder—doesn’t really matter which. The file looks like this:
version: '2'
# here I have all of the containers
services:
# database container
 db:
   image: mysql
   environment:
     # Environment variable
     MYSQL_ROOT_PASSWORD: password
   ports:
     - "3306:3306"
# PHPMyAdmin container
 phpmyadmin:
   image: phpmyadmin/phpmyadmin
   depends_on:
     - db
   ports:
     - "8080:80"
The file is pretty simple. The version is the version of Docker—usually 2 or 3 unless you need something more complicated. Then comes services where we specify all the containers we need—in this case, 2. The first is db. There we specify the name of the image which is the same as the official image from Docker (it could also be an image that we made ourselves). Then there are the environmental variables that the containers need.
In this case, we need to make the container by running:
docker run --name some-mysql -e MYSQL_ROOT_PASSWORD=my-secret-pw -d mysql
Because of this, we need to add MYSQL_ROOT_PASSWORD and the value we want to give it.
If we have dependencies, we add them to depends_on. In this case, phpmyadmin is dependent on db since, without it, it doesn’t have the right to exist.
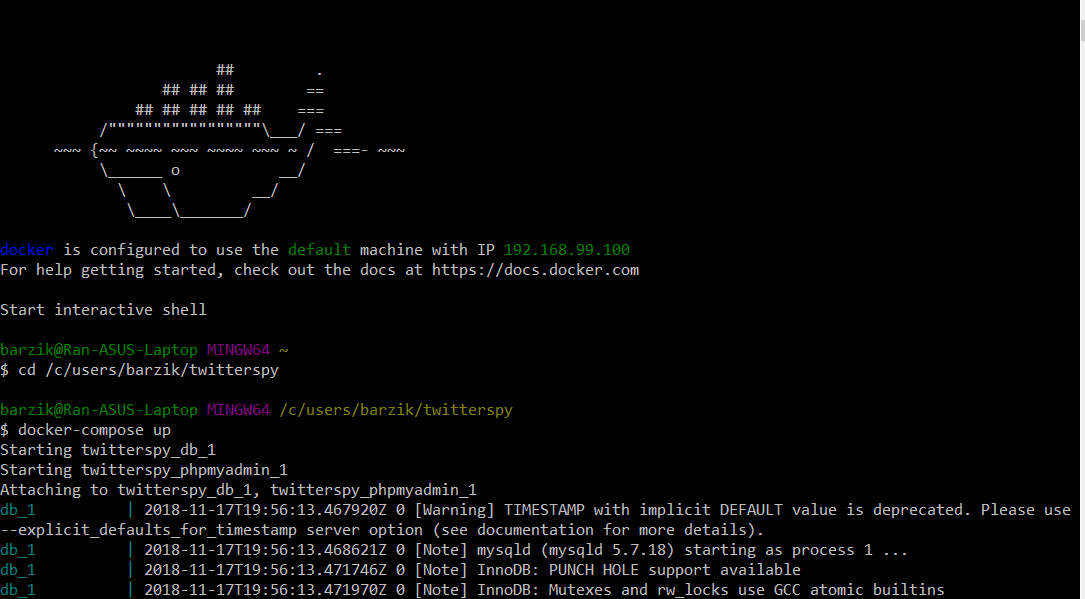
After we’ve created the compose file, we’ll open the Docker console—which we learned about previously in the series—and run docker-compose up.

Docker console with compose up
And that’s it! Everything is ready to go. You can simply connect to Docker’s IP with the phpmyadmin port and see how we can start working. It’s really that simple. The password is root and the user is whatever was set in the setting file. That’s it.
Working with Docker compose is truly simple. I know there’s a tendency to let devops take care of this kind of thing, but really there’s no need. What we’ve got here is a platform for making environments that is easy to use, pleasant to work with, and will save you lots and lots of time—even for relatively complex environments.
One final note: don’t use the file that we worked with here in a production environment. The username/password combo of root and password is not the best idea for an outside server.
About the author: Ran Bar-Zik is an experienced web developer whose personal blog, Internet Israel, features articles and guides on Node.js, MongoDB, Git, SASS, jQuery, HTML 5, MySQL, and more. Translation of the original article by Aaron Raizen.
Recent Stories
Top DiscoverSDK Experts


Compare Products
Select up to three two products to compare by clicking on the compare icon () of each product.
{{compareToolModel.Error}}


{{CommentsModel.TotalCount}} Comments
Your Comment