Interesting Python modules
In light of the large response to our pervious article, 10 interesting Python modules to learn in 2016, we've decided to continue with even more Python modules. We've collect some of the top requested and recommended modules by Reddit community and have put together a second list. So let's get started!
Pytest is a full-featured Python testing framework that helps you test your program.
At first let us install the tool by insert the following command in CMD:
Note that if you work with Spyder No installation is required.
pip install -U pytest
Now let us check an arbitrary function by creating test1.py file containg the next functions:
def Plus(a,b):
    return a + b

def test_answer():
    assert Plus(3,2) == 5
The function assert running a test on your function.
In order to Receive the test results. We use the following line on CMD:
Those two rows are identical:
pytest test1.py
python -m pytest test1.py
In the CMD that looks like this:
pytest C:\Users\USER\Desktop\test1.py
============================= test session starts =============================
platform win32 -- Python 2.7.12, pytest-3.0.0, py-1.4.31, pluggy-0.3.1
rootdir: C:\Users\USER, inifile:
collected 1 items

Desktop\test1.py .

========================== 1 passed in 0.02 seconds ===========================
For a verbal display let's insert the next lines at CMD:
python -m pytest -v test1.py
py.test -v test1.py
We'll receive:
============================= test session starts =============================
platform win32 -- Python 2.7.12, pytest-3.0.0, py-1.4.31, pluggy-0.3.1 -- C:\Users\USER\Anaconda2\python.exe
cachedir: .cache
rootdir: C:\Users\USER, inifile:
collected 1 items

Desktop/test1.py::test_answer PASSED

========================== 1 passed in 0.01 seconds ===========================
The test has been passed, namely, the function works correctly.
Now let’s run a test for a failed result:
def Plus(a,b):
    return a + b

def test_answer():
    assert Plus(3,2) == 4
At CMD Let's Input:
pytest test1.py
python -m pytest test1.py
And the output will be:
_________________________________ test_fun ___________________________________

    def test_fun():
>       assert Plus(3,2) == 4
E       assert 5 == 4
E        +  where 5 = Plus(3, 2)

Desktop\test1.py:12: AssertionError
========================== 1 failed in 0.05 seconds ===========================
Note that assert function saves the need for understanding of the components of a particular function, and gives you the value it expects to receive.
The same a test can be run more simply in Spyder by import pytest and call the testing function:
In [1]: import pytest
In case the test succeed the function dose not returne anything, otherwise will be returned:
In [2]: test_fun()
Traceback (most recent call last):

  File "<ipython-input-32-97a1938dfe72>", line 1, in <module>
    test_fun()

  File "<ipython-input-30-60cba3ee17f2>", line 5, in test_fun
    assert Plus(3,2) == 4

AssertionError
Running multiple tests with a class:
class TestClass:
    def test_one(self):
        x = "Discover"
        assert 'D' in x

    def test_two(self):
        y = "SDK"
        assert abs(-4) == 3
Running the file at the command window will return:
================================== FAILURES ===============================
_____________________________ TestClass.test_two ______________________________

self = <test1.TestClass instance at 0x0000000003D19108>

    def test_two(self):
        y = "SDK"
>       assert abs(-4) == 3
E       assert 4 == 3
E        +  where 4 = abs(-4)

Desktop\test1.py:14: AssertionError
1 failed, 1 passed in 0.05 seconds
We can see that the first function has succeeded, while the second function had failed. assertion, Gives us an indication of the reason for the failure.
assert that exception is raised:
In order to assert that some code raises an exception you can use raises:
import pytest

def test():
    with pytest.raises(BaseException):
        raise BaseException(1)
And the CMD will be looked like:
============================= test session starts =============================
platform win32 -- Python 2.7.12, pytest-3.0.0, py-1.4.31, pluggy-0.3.1
rootdir: C:\Users\USER, inifile:
collected 1 items

Desktop\test1.py.

========================== 1 passed in 0.03 seconds ===========================
Pyprind (Python Progress Indicator) provides a progress bar and a percentage indicator object.
Allows you monitor the progression of various activities such as loops and various calculations.
Very useful action is tracking the progress of large data sets and providing an effective runtiem estimate about the progression.
For installation let us open the CMD and type:
In [1]: pip install pyprind

Or

In [1]: easy_install pyprind


In [2]: import pyprind
Progress Bar
In [3]: import time
n = 50

sign = pyprind.ProgBar(n, bar_char='*')
for i in range(n):
    time.sleep(0.1) # your computation here
    sign.update()
We'll get the next Progress Bar:
0%                          100%
[******************************] | ETA: 00:00:00
Total time elapsed: 00:00:05


perc = pyprind.ProgPercent(n)
for i in range(n):
    time.sleep(timesleep) # your computation here
    perc.update()
Percentage Indicator
In [4]:percent = pyprind.ProgPercent(n)
for i in range(n):
    time.sleep(0.1)
    percent.update()

[100 %] Time elapsed: 00:00:05 | ETA: 00:00:00
Total time elapsed: 00:00:05
tracking report
You can get more specific information on the tracking of the loop by adding a command print(sign):
sign = pyprind.ProgBar(n)
for i in range(n):
    time.sleep(0.1)
    sign.update()
print(sign)

0%                          100%
[##############################] | ETA: 00:00:00
Total time elapsed: 00:00:05
Title:
  Started: 08/24/2016 10:35:28
  Finished: 08/24/2016 10:35:33
  Total time elapsed: 00:00:05
We Can also monitored the memory and CPU by adding the following command:
sign = pyprind.ProgBar(n, monitor=True)


0%                          100%
[##############################] | ETA: 00:00:00
Total time elapsed: 00:00:10
Title:
  Started: 08/24/2016 10:42:28
  Finished: 08/24/2016 10:42:38
  Total time elapsed: 00:00:10
  CPU %: 0.30
  Memory %: 1.78
Setting Title, Change the bar width, Determining the scale icon.
We can easily set a title for the report, by adding title='tiltle' in pyprind.ProgBar. for changing the bar width add width= . for choosing the scale icon add bar_char='sign'. in pyprind.ProgBar.
sign = pyprind.ProgBar(n, title='prog1',width=5,bar_char='█' )
for i in range(n):
    time.sleep(0.2)
    sign.update()

prog1
0%  100%
[█████] | ETA: 00:00:00
Total time elapsed: 00:00:10
Stopping the process
You can perform a stop at selected index:
sign = pyprind.ProgBar(n)
for i in range(n):
    time.sleep(0.1)
    if i == 25:
        sign.stop()
sign.update()

0%                          100%
[##############################] | ETA: 00:00:00
Total time elapsed: 00:00:02

Total time elapsed: 00:00:05
Update interval time
Update process at selected interval by adding update_interval:
n = 50
bar = pyprind.ProgBar(n, update_interval=2 , width=5)
for i in range(n):
    time.sleep(0.2)
    bar.update()

0%  100%
[#####] | ETA: 00:00:00
Total time elapsed: 00:00:10
tqdm
tqdm let you add A progress bar for examine your loops running
for installation, insert the next command into CMD:
pip install tqdm
Now let us go beck to python and ipmort tqdm library:
In [1]: from tqdm import tqdm
At tqdm unlike pyprind we will use with sentence
with tqdm(total=100) as barval:
   for i in range(5):
       barval.update(20)

100%|██████████| 100/100 [00:00<?, ?it/s]
You can give up the with sentence by adding .close ():
barval = tqdm(total=100)
for i in range(100):
    barval.update(1)
barval.close()

100%|██████████| 100/100 [00:00<?, ?it/s]
Unlike tqdm, here there is no need to use the Print command to see the progress data.
nested loops progress
from tqdm import trangetrange(i) is a special optimised instance of tqdm(range(i)):
from tqdm import trange
from time import sleep

for i in trange(5, desc='first'):
    for j in trange(1, desc='scond', leave=False):
        for k in trange(3, desc='third'):
            sleep(0.1)
Add a Comment
You can print a title for each loop by using tqdm.write
val = trange(5)
for i in val:
    sleep(0.2)
    if not (i == 2):
        tqdm.write("Loop %i" % i)

Loop 0         | 0/5 [00:00<?, ?it/s]
Loop 1         | 1/5 [00:00<00:00,  4.26it/s]
Loop 3█████    | 3/5 [00:00<00:00,  4.55it/s]
Loop 4    ███  | 4/5 [00:00<00:00,  4.41it/s]
100%|██████████| 5/5 [00:01<00:00,  4.44it/s]
Unittest2 is a unit testing framework module which provides a rich set of tools for running tests. Test has two parts, code to manage “fixtures”, and the test itself. Individual tests are created by subclassing unittest.TestCase and overriding or adding appropriate methods.
unittest2 is a backport of the features that are added to the unittest framework in Python 2.7 and forward versions.
Let's takt a look at some innovations which are added to Unittest2:
- addCleanups allows better resource management
- Assert methods renewals such as better defaults for lists comparing , sets, dicts unicode strings and more. In addition able to specify new default methods for comparing specific types.
- assertRaises as context manager, with access to the exception afterwards
- test discovery and new command line options.
- class and module level fixtures: setUpClass, tearDownClass, setUpModule, tearDownModule
- Allows to skip specific tests and even classics, and can Indicates on expected failures.
- new delta keyword argument to assertAlmostEqual for non-numeric objects comparisons .
For installation(CMD):
pip install unittest2
Let's take a look at a simple example:
Note that this example ran directly from the python shell.
import unittest2

class SimplisticTest(unittest.TestCase):

    def test(self):
        self.assertEqual('sdk'.upper(), 'SDK')

if __name__ == '__main__':
    unittest.main()

----------------------------------------------------------------------
Ran 1 test in 0.000s
Unittest can be used from the CMD by the next command:
Note that you need to redirect by cd cammand in CMD to the folder where the file is:
python -m unittest test_module1 test_module2
python -m unittest test_module.TestClass
python -m unittest test_module.TestClass.test_method
You can run more detailed tests (verbosity) by:
python -m unittest -v test_module
The following command in CMD will show us a list of all command-line possibilities:
python -m unittest -h
Test Discovery
To allow proper operation of the Test Discovery
all of the test files must be modules or packages importable from the top-level directory of the project.
Skipping tests
Unittest allows skipping specific test and whole classes of tests if necessary.
Kivy
Kivy is an open source Python library enabling easy and fast application development. Using user interfaces technologies such as multi-touch apps.
Kivy is based on OpenGL ES 2. In addition it supports diverse input devices and has a wide gadgets library.
installation instructions:
Open the CMD window and type the next lines:
python -m pip install --upgrade pip wheel setuptools


python -m pip install docutils pygments pypiwin32 kivy.deps.sdl2 kivy.deps.glew
Note that you can skip gstreamer instalation if not necessary(90MB)
python -m pip install kivy.deps.gstreamer --extra-index-url https://kivy.org/downloads/packages/simple/
python -m pip install kivy
Now there should be no problem to importe kivi.
Let’s take a look at a simple examle:
from kivy.app import App
from kivy.uix.button import Button

from kivy.app import App
from kivy.uix.button import Button

class TestApp(App):
    def build(self):
        return Button(text='Discover SDK')

TestApp().run()
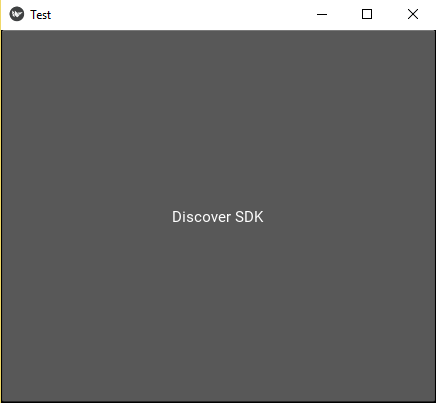
Now the next separate window should be opened:

A range of more examples you cam find here.
Keras
Keras is a Deep Learning library for Theano and TensorFlow
It has written in Python and Optimized run on top of both TensorFlow and Theano. It is designed to allow quick experimentation. It's modular and provide simple expansion.
In addition it supports convolutional networks and recurrent networks Separately and together.
Keras is adjusted for Python 2.7-3.5.
Before start Keras instalation be sure that you have Theano or TensorFlow.
For example Theano instalation will be done by the next command(CMD):
pip install TheanoNote that Keras uses Theano as its tensor manipulation library By default. you can say that Keras is a Theano's wrapper designed to make it more accessible for useres.
Keras uses the following libraries:
- numpy, scipy, pyyaml, HDF5 and h5py and cuDNN if you use CNNs.
pip install numpy scipy
pip install scikit-learn
pip install pillow
pip install h5py
Now let's install Kras:
pip install kerasNow let's check if Keras has been installed successfully by import it to the Python shell:
import kerasSequential model
from keras.models import Sequential
from keras.layers import Dense, Activation
model = Sequential()

model = Sequential([
    Dense(output_dim=32, input_dim=784),
    Activation('relu'),
    Dense(10),
    Activation('softmax'),
])
we also can add layers by .add() :
model.add(Dense(output_dim=64, input_dim=784))
model.add(Activation('relu'))
Compilation
When your model si set and before you move for the training model , you should formate the learning process. This can be done by compile class. whcih receives three arguments: an optimizer, a loss function and a list of metrics
model.compile(loss='categorical_crossentropy', optimizer='rmsprop', metrics=['accuracy'])
Training
For training yout model, Let's use the fit function.
model.fit(train1, train2, nb_epoch=5, batch_size=32)


Epoch 1/5
1000/1000 [==============================] - 0s - loss: 0.7270 - acc: 0.4960
Epoch 2/5
1000/1000 [==============================] - 0s - loss: 0.7117 - acc: 0.5180
Epoch 3/5
1000/1000 [==============================] - 0s - loss: 0.7064 - acc: 0.5240
Epoch 4/5
1000/1000 [==============================] - 0s - loss: 0.6977 - acc: 0.5300
Epoch 5/5
1000/1000 [==============================] - 0s - loss: 0.6843 - acc: 0.5730
Out[26]: <keras.callbacks.History at 0xf563a58>
For Evaluatung your performance:
loss_and_metrics = model.evaluate(train1, train2, batch_size=32)
 960/1000 [===========================>..] - ETA: 0s
TFlearn is a modular deep learning library run on top of Tensorflow. It wrappes the Tensorflow in order to make it more user friendly and to accelerate the
experimentations, by provinding a higher-level API.
TFlearn also supports most of recent deep learning models, such as Convolutions, LSTM, BiRNN, BatchNorm
installation:
pip install tflearn
The following example taken from the official website of TFlearn and demonstrates the effectiveness of its API:
with tf.name_scope('conv1'):
    W = tf.Variable(tf.random_normal([5, 5, 1, 32]), dtype=tf.float32, name='Weights')
    b = tf.Variable(tf.random_normal([32]), dtype=tf.float32, name='biases')
    x = tf.nn.conv2d(x, W, strides=[1, 1, 1, 1], padding='SAME')
    x = tf.add_bias(W, b)
    x = tf.nn.relu(x)
The same operation is written more efficiently with TFlearn:
tflearn.conv_2d(x, 32, 5, activation='relu', name='conv1')
Nose2 is the update for Nose the unit test framework and based on unittest2.
several effective changes had made since the firs generation nose, Including:
- A significant improvement in plugin api
- More accessible and more user-friendly
- simplifying internal Processes.
- compatible with Python 2.6-3.4 based on the same codebase, without translation.
However, some of nose features are no supprted by nose2.. you will able to find them here.
installation:
pip install nose2
In order to run the test, the code name have to starts with the word test. any other combination of the names will not work. for eample:
test1.py ------> will wotk

example1.py ------> will not work
We want to examine the following functions:
We would expect to ger test failed for the second function.
def multiply(a,b):
    return a*b

def test_num_mul():
    assert multiply(5,6) == 30

def test_str_mul():
    assert multiply('g',5) == 'ggg'
Now we can run the test by the following command at CMD:
Note that it is necessary to redirect with cd to the file's folder.
nose2
And the output much like uinitest, will be:
.F
======================================================================
FAIL: test1.FunctionTestCase (test_str_mul)
----------------------------------------------------------------------
Traceback (most recent call last):
  File "C:\Users\USER\Desktop\test1.py", line 15, in test_str_mul
    assert multiply('g',5) == 'ggg'
AssertionError

----------------------------------------------------------------------
Ran 2 tests in 0.000s

FAILED (failures=1)
we can get help for nose2 plugins by:
nose2 -h
usage: nose2 [-s START_DIR] [-t TOP_LEVEL_DIRECTORY] [--config [CONFIG]]
             [--no-user-config] [--no-plugins] [--plugin PLUGINS]
             [--exclude-plugin EXCLUDE_PLUGINS] [--verbose] [--quiet]
             [--log-level LOG_LEVEL] [-B] [--log-capture] [-D]
             [--coverage PATH] [--coverage-report TYPE]
             [--coverage-config FILE] [-C] [-F] [-h]
             [testNames [testNames ...]]

positional arguments:
  testNames

optional arguments:
  -s START_DIR, --start-dir START_DIR
                        Directory to start discovery ('.' default)
  -t TOP_LEVEL_DIRECTORY, --top-level-directory TOP_LEVEL_DIRECTORY, --project-directory TOP_LEVEL_DIRECTORY
                        Top level directory of project (defaults to start dir)
  --config [CONFIG], -c [CONFIG]
                        Config files to load, if they exist. ('unittest.cfg'
                        and 'nose2.cfg' in start directory default)
  --no-user-config      Do not load user config files
  --no-plugins          Do not load any plugins. Warning: nose2 does not do
                        anything if no plugins are loaded
  --plugin PLUGINS      Load this plugin module.
  --exclude-plugin EXCLUDE_PLUGINS
                        Do not load this plugin module
  --verbose, -v         print test case names and statuses
  --quiet
  --log-level LOG_LEVEL
                        Set logging level for message logged to console.
  -h, --help            Show this help message and exit

plugin arguments:
  Command-line arguments added by plugins:

  -B, --output-buffer   Enable output buffer
  --log-capture         Enable log capture
  -D, --debugger        Enter pdb on test fail or error
  --coverage PATH       Measure coverage for filesystem path (multi-allowed)
  --coverage-report TYPE
                        Generate selected reports, available types: term,
                        term-missing, annotate, html, xml (multi-allowed)
  --coverage-config FILE
                        Config file for coverage, default: .coveragerc
  -C, --with-coverage   Turn on coverage reporting
  -F, --fail-fast       Stop the test run after the first error or failure
TensorFlow
TensorFlow isTensor workflow (TensorFlow) is an open source software library for machine learning used in Google products (machine learning). The flexible architecture allows you to deploy computation to one or more CPUs or GPUs in a desktop, server, or mobile device with a single API.
TensorFlow has vast structured support for deep learning. Moreover you able to compute with TensorFlow any calculation that can be expressed by a computational flow graph.
The TensorFlow Python API supports Python 2.7 and Python 3.3 and forward.
Jupyter Notebook
The Jupyter Notebook is a web app that allows to create and share live code documents , equations, plots an so on. It Has become a very popular tool for scientific processes. Allows you to run your work and get results immediately in real time.
Although i put it here under the association to Python. It has support for many additional languages. In fact over 40.
including: data cleaning and transformation, numerical simulation, statistical modeling, machine learning and more.
There are several ways to install Jupiter, one of them and the convenient in my opinion , is by downloading and installing Anaconda. Jupiter can be run directly from Anaconda.
Recent Stories
Top DiscoverSDK Experts


Compare Products
Select up to three two products to compare by clicking on the compare icon () of each product.
{{compareToolModel.Error}}


{{CommentsModel.TotalCount}} Comments
Your Comment