Fragments in Android
This article will guide us to use a powerful User Interface tool Android has provided as a result of the evolution it has gone through over the years.
Earlier, user interface design involved design for complete screen irrespective of the orientation change and varying screen sizes of Android devices. Then, Fragment was introduced which made the design SMARTER !
Fragments
A Fragment represents a portion of user interface in an Activity. You can combine multiple fragments in a single activity to build a multi-pane UI and reuse a fragment in multiple activities.
When a fragment specifies its own layout, it can be configured in different combinations with other fragments inside an activity to modify app’s layout configuration for different screen sizes (a small screen might show one fragment at a time, but a large screen can show two or more).
>>> A fragment must always be embedded in an activity and the fragment's lifecycle is directly affected by the host activity's lifecycle.
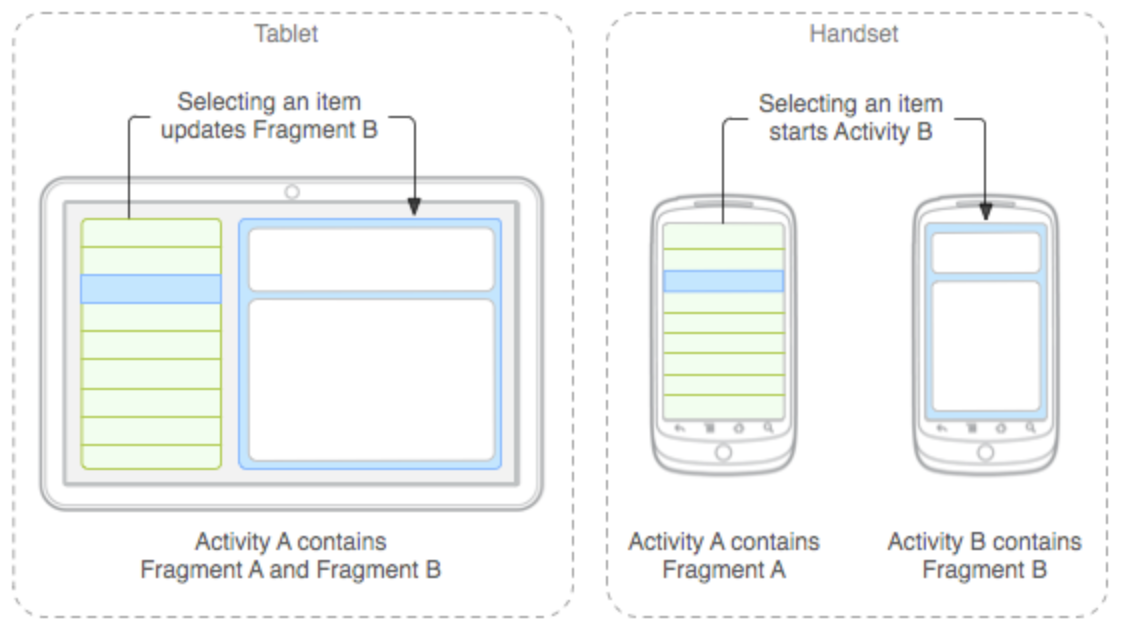
A Fragment is made as a subclass of a Fragment as shown:
public class DiscoverFragment extends Fragment {
}
Before fragments were introduced, developer’s had a limitation because apps can show only a single activity on the screen at a given time. So, dividing a screen in separate parts to control each part individually was not possible. But with the entrance of fragment API, more flexibility was introduced which removed the limitation of having a single activity on the screen at a time. Now we can have a single activity but each activity can comprise of multiple fragments which will have their own layout, events and complete life cycle methods and callbacks.
Important points
Some points to notice about fragments are:
- A fragment has its own layout and its own behaviour with its own lifecycle callback methods.
- Fragments can be added or deleted in an activity while the activity is running.
- Multiple fragments can be combined in one activity to build a multi-pane UI.
- A fragment can be used in multiple activities.
- Fragment life cycle is closely related to the life cycle of its host activity which means when the activity is paused, all the fragments available in the activity will also be stopped.
- A fragment can implement a behaviour that has no user interface component.
- Fragments were added to the Android API in Honeycomb version of Android which API version 11.
How to use Fragments?
This involves a number of simple steps to create Fragments.
- First of all decide how many fragments you want to use in an activity. For example let's say we want to use two fragments to handle landscape and portrait modes of the device.
- Next based on the number of fragments, create classes which will extend the Fragment class. The Fragment class has above mentioned callback functions. You can override any of the functions based on your requirements.
- Corresponding to each fragment, you will need to create layout files in XML file. These files will have layout for the defined fragments.
- Finally modify activity file to define the actual logic of replacing fragments based on your requirement.
Types of Fragments
Fragments are divided as three types as shown:
- Single frame fragments − Single frame fragments are using for handheld devices like mobiles, here we can show only one fragment.
- List fragments − Fragments having special list view are called as List fragments.
- Fragments transaction − Using with Fragment transactions, we can move one fragment to another fragment.
Fragment Lifecycle
To create a fragment, you must create a subclass of Fragment (or an existing subclass of it), as shown previously. The Fragment class has code that looks a lot like an Activity. It contains callback methods similar to an activity, such as onCreate(), onStart(), onPause(), and onStop(). In fact, if you're converting an existing Android application to use fragments, you might simply move code from your activity's callback methods into the respective callback methods of your fragment.
Usually, you should implement at least the following lifecycle methods:
- onCreate() : The system calls this when creating the fragment. Within your implementation, you should initialize essential components of the fragment that you want to retain when the fragment is paused or stopped, then resumed.
- onCreateView() : The system calls this when it's time for the fragment to draw its user interface for the first time. To draw a UI for your fragment, you must return a View from this method that is the root of your fragment's layout. You can return null if the fragment does not provide a UI.
- onPause() : The system calls this method as the first indication that the user is leaving the fragment (though it does not always mean the fragment is being destroyed). This is usually where you should commit any changes that should be persisted beyond the current user session (because the user might not come back).
Most applications should implement at least these three methods for every fragment, but there are several other callback methods you should also use to handle various stages of the fragment lifecycle.
Example
Enough of the theory, here, we will create an Activity with two fragments.
Our MainActivity.java will look like this:
package discoversdk.com.fragmentexample;

import android.support.v7.app.AppCompatActivity;
import android.os.Bundle;

public class MainActivity extends AppCompatActivity {

   @Override
   protected void onCreate(Bundle savedInstanceState) {
       super.onCreate(savedInstanceState);
       setContentView(R.layout.activity_main);
   }
}
Nothing fancier here. Let’s look at the activity_main.xml,
<LinearLayout xmlns:android="http://schemas.android.com/apk/res/android"
   android:layout_width="match_parent"
   android:layout_height="match_parent" >

   <fragment
       android:id="@+id/fragment_first"
       android:name="discoversdk.com.fragmentexample.FirstFragment"
       android:layout_width="0dip"
       android:layout_weight="0.50"
       android:layout_height="match_parent" >
   </fragment>

   <fragment
       android:id="@+id/fragment_second"
       android:name="discoversdk.com.fragmentexample.SecondFragment"
       android:layout_width="0dip"
       android:layout_weight="0.50"
       android:layout_height="match_parent" >
   </fragment>

</LinearLayout>
Let’s see out FirstFragment.java,
package discoversdk.com.fragmentexample;

import android.app.Activity;
import android.app.Fragment;
import android.app.FragmentManager;
import android.os.Bundle;
import android.view.LayoutInflater;
import android.view.View;
import android.view.ViewGroup;
import android.widget.Button;
import android.widget.EditText;
import android.widget.Toast;

public class FirstFragment extends Fragment {

   @Override
   public View onCreateView(LayoutInflater inflater, ViewGroup container,
                            Bundle savedInstanceState) {
       View view = inflater.inflate(R.layout.fragment_first, container, false);

       final EditText etName = (EditText) view.findViewById(R.id.et_name);
       Button btnSayHello = (Button) view.findViewById(R.id.btn_hello);

       btnSayHello.setOnClickListener(new View.OnClickListener() {

           @Override
           public void onClick(View v) {
               String name = etName.getText().toString();

               FragmentManager fm = getFragmentManager();
               SecondFragment f2 = (SecondFragment) fm.findFragmentById(R.id.fragment_second);

               if (f2 != null && f2.isInLayout()) {
                   f2.setName(name);
               }

               Activity activity = getActivity();

               if (activity != null) {
                   Toast.makeText(activity, "Hello.", Toast.LENGTH_LONG).show();
               }
           }
       });

       return view;
   }
}
Followed is fragment_first.xml,
<?xml version="1.0" encoding="utf-8"?>
<LinearLayout xmlns:android="http://schemas.android.com/apk/res/android"
   android:layout_width="match_parent"
   android:layout_height="match_parent"
   android:padding="16dp"
   android:orientation="vertical" >

   <EditText
       android:id="@+id/et_name"
       android:layout_width="match_parent"
       android:layout_height="wrap_content"
       android:ems="10"
       android:inputType="textPersonName" >

       <requestFocus />
   </EditText>

   <Button
       android:id="@+id/btn_hello"
       android:layout_width="wrap_content"
       android:layout_height="wrap_content"
       android:text="Say Hi" />

</LinearLayout>
Here is the SecondFragment.java,
package discoversdk.com.fragmentexample;

import android.app.Fragment;
import android.os.Bundle;
import android.view.LayoutInflater;
import android.view.View;
import android.view.ViewGroup;
import android.widget.TextView;

public class SecondFragment extends Fragment {

   private View view;

   @Override
   public View onCreateView(LayoutInflater inflater, ViewGroup container,
                            Bundle savedInstanceState) {
       view = inflater.inflate(R.layout.fragment_second, container, false);
       return view;
   }

   public void setName(String name) {
       TextView txtName = (TextView) view.findViewById(R.id.txtViewResult);
       txtName.setText("Hi " + name);
   }

}
Don’t forget the layout, fragment_second.xml,
<?xml version="1.0" encoding="utf-8"?>
<LinearLayout xmlns:android="http://schemas.android.com/apk/res/android"
   android:layout_width="match_parent"
   android:layout_height="match_parent"
   android:padding="16dp"
   android:orientation="vertical" >

   <TextView
       android:id="@+id/txtViewResult"
       android:layout_width="wrap_content"
       android:layout_height="wrap_content"
       android:text="I will say Hi" />

</LinearLayout>
Our strings.xml file looks like,
<resources>
   <string name="app_name">Discover SDK Fragments</string>
</resources>
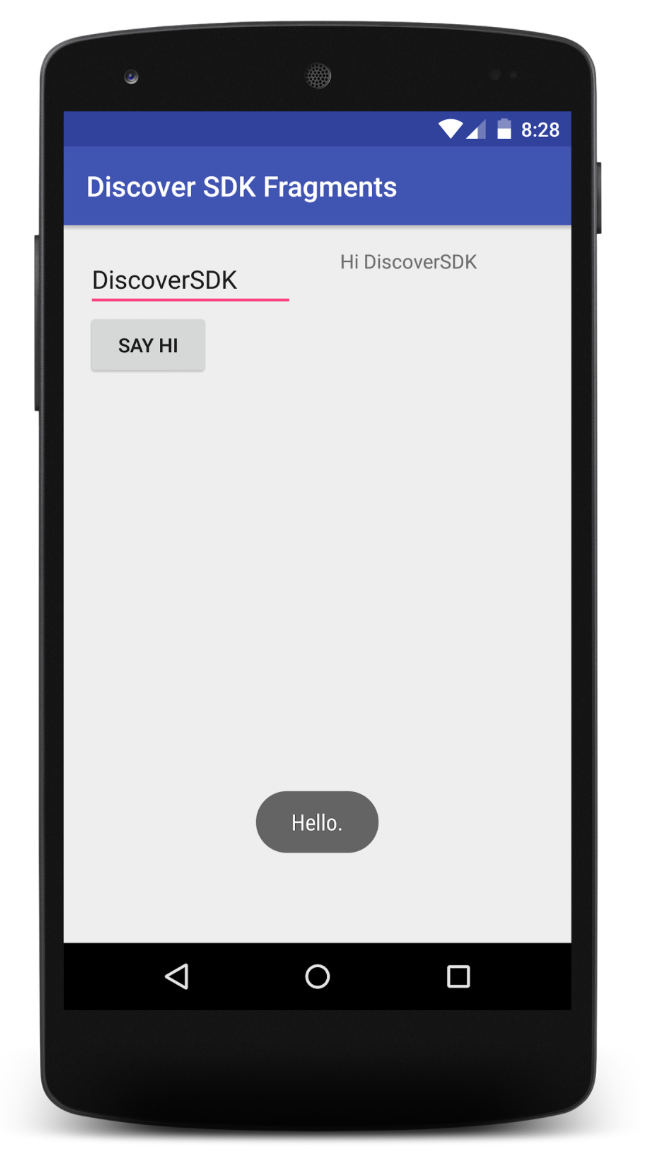
Here is what our app look like:
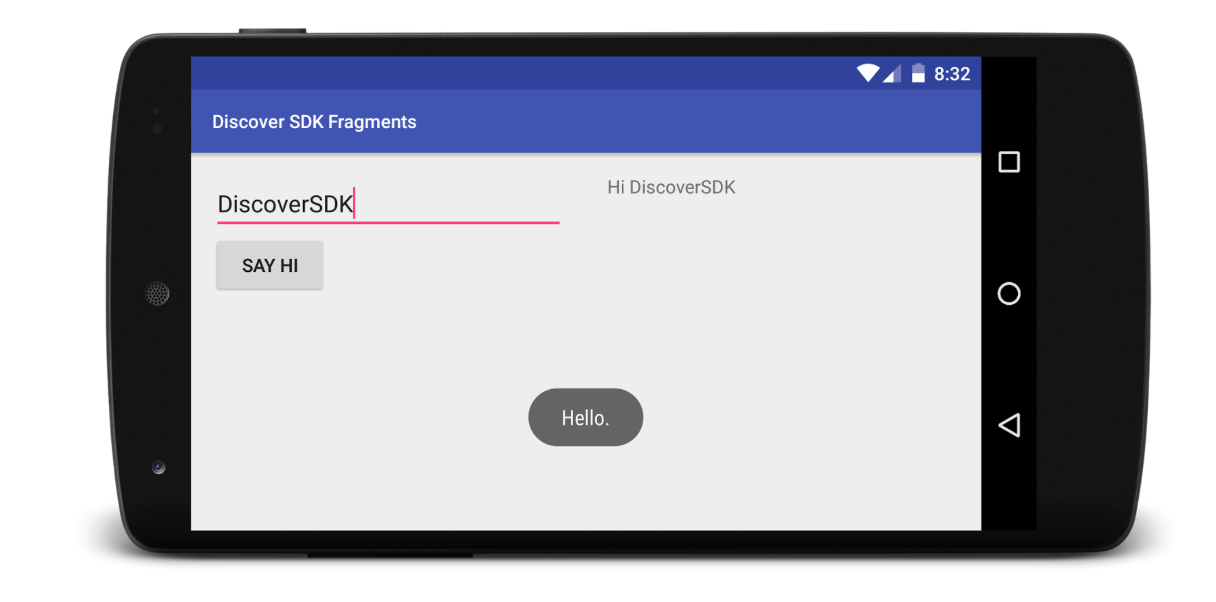
In landscape mode, app looks like:
Fragment vs Custom Views
The main reason is that fragments are more reusable than custom views.
Sometimes you can't create a fully encapsulated UI component relying on views alone. This is because there are things you would want to put into your view but can't because only an Activity can handle them, thus forcing tight coupling between an Activity and a View.
Here is one such example. Let’s say you want to create a reusable UI component that, among many things, wants to capture a photo and do something with it. Traditionally you would fire an intent that starts the camera and returns with the captured image.
Notice that your custom UI component can't fully encapsulate this functionality because it will have to rely on hosting Activity startActivityForResult because views don't accept activity results (they can indirectly fire an intent through context).
Now if you wanted to reuse your custom UI component in different activities you would be repeating the code for Activity.startActivityForResult.
Fragment on the other hand cleanly solve this problem.
Similarly your fragment can contribute items to your options menu, something traditionally only an Activity could do. Again this could be important if the state of your custom view dictates what goes in the menu.
The main reason to use Fragments are for the backstack and lifecycle features. Otherwise, custom views are more lightweight and simpler to implement.
Conclusion
This article showed an example of how to use fragments inside an Activity and what flexibility they introduce in a User Interface design.
It is important to understand the ‘Fragments vs Custom Views’ section because sometimes, Fragments actually bring an overhead of work which was not actually required. I hope this guide brings you clarity on how Fragments work.
Recent Stories
Top DiscoverSDK Experts


Compare Products
Select up to three two products to compare by clicking on the compare icon () of each product.
{{compareToolModel.Error}}



{{CommentsModel.TotalCount}} Comments
Your Comment