Angular 5 To-Do List App - Part 5
In the previous article we have learned how to implement a delete feature of a to-do application, and how to ask for confirmation before deleting a task or clearing the whole list of tasks. The code of the previous article can be found in the article itself, and the complete project can be found in the Github repository Learn Angular With Sabuj. Browse to the branch named todo-app-part-4 to get the full project code of the previous article. To get the full project of the current article browse to the branch named todo-app-part-5.
In this article we are going to code for editing our tasks.
Editing Tasks
Until now we learned to clear, cancel, undo canceling and delete tasks. It was not very easy to carry out those job. Editing a task is not harder than those things. Let's start working on it.
First we need to add another column to our to-do table for placing edit buttons. We will use Bootstrap button of type primary. We will also add a click handler method named editTask() that we will add later in our component class.
<button class="btn btn-primary btn-xs" (click)="editTask(idx)"> Edit </button>Our column markup will look like below.
<td>
   <button class="btn btn-primary btn-xs" (click)="editTask(idx)"> Edit </button>
</td>
We want to place the Edit button in front of Cancel and Delete.
<tr *ngFor="let task of tasks; let idx = index">
   <td *ngIf="task.is_canceled; else elseTd">
       <s>{{ idx + 1 }}. {{task.title}}</s>
   </td>
   <ng-template #elseTd>
       <td>{{ idx + 1 }}. {{task.title}}</td>
   </ng-template>

   <td>
       <button class="btn btn-primary btn-xs" (click)="editTask(idx)"> Edit </button>
   </td>

   <td>
       <button class="btn btn-warning btn-xs" (click)="cancelTask(idx)"> Cancel </button>
   </td>
   <td>
       <button class="btn btn-danger btn-xs" (click)="deleteTask(idx)"> Delete </button>
   </td>
</tr>
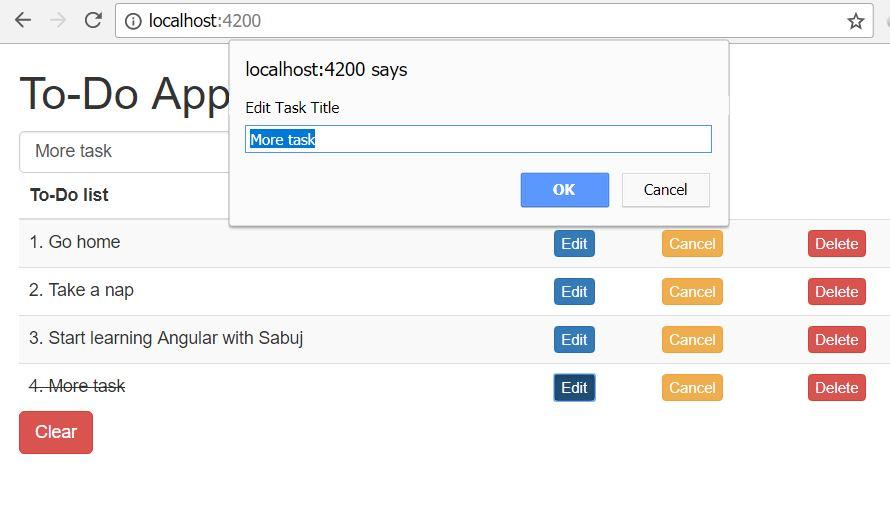
We need an input box to edit the text of the task we intend to edit. Instead of creating complex things like modals, we can use the default prompt function to edit the text. Upon clicking the Ok button it will return the text of the edit box, and on clicking the Cancel button it will return null. So, let's implement the editTask() method inside the component.
 editTask(idx: number){
   let title = this.tasks[idx].title;
   let result = prompt("Edit Task Title", title);
   if (result !== null){
     this.tasks[idx].title = result;
   }
 }
Go to the browser to check out the functionality. Yeah! It's working perfectly.
But did you find one very annoying problem? If you clear the text box and click Ok, the task becomes empty and only the task numbering stays there. So, we need to check if the returned result is an empty string. If it is an empty string then we will do nothing.
 editTask(idx: number){
   let title = this.tasks[idx].title;
   let result = prompt("Edit Task Title", title);
   if (result !== null && result !== ""){
     this.tasks[idx].title = result;
   }
 }
Go to the browser and try checking if the issue still persists.

So, our task editing feature is complete now.
Keeping the Add Input Clean
Did you notice one thing that whenever we add some task with the add button the add input box does not get cleared up? We do not want to keep pressing backspace button or select all and delete the text inside the input box. We need it cleared every time a task is added. To do so we will no longer pass the value of the input box from template, instead we will pass the reference to that input box, so that we can take the value and clear it according to our need.
So, the addTask() method will look like below now:
 addTask(input){
   let value = input.value;
   input.value = "";
   this.tasks.push(
     {
       title: value,
       is_canceled: false
     });
 }
We will also need to make changes to our template accordingly:
<button class="btn btn-info" (click)="addTask(taskInput)">Add</button>
Now, go to the browser to check if everything is working the way we expect.
The final template of our application looks like below:
<div class="container">
   <div class="row">
       <div class="col-xs-12">
           <h1> To-Do Application </h1>
       </div>
   </div>
</div>

<div class="container">
   <div class="row">
       <div class="col-xs-8">
           <input type="text" class="form-control" name="task" placeholder="Task" #taskInput>
       </div>

       <div class="col-xs-4">
           <button class="btn btn-info" (click)="addTask(taskInput)">Add</button>
       </div>
   </div>

   <div class="row">
       <div class="col-xs-12">
           <table class="table table-striped">
               <thead>
                   <tr>
                       <th>To-Do list</th>
                   </tr>
               </thead>
               <tbody>
                   <tr *ngFor="let task of tasks; let idx = index">
                       <td *ngIf="task.is_canceled; else elseTd">
                           <s>{{ idx + 1 }}. {{task.title}}</s>
                       </td>
                       <ng-template #elseTd>
                           <td>{{ idx + 1 }}. {{task.title}}</td>
                       </ng-template>

                       <td>
                           <button class="btn btn-primary btn-xs" (click)="editTask(idx)"> Edit </button>
                       </td>

                       <td>
                           <button class="btn btn-warning btn-xs" (click)="cancelTask(idx)"> Cancel </button>
                       </td>
                       <td>
                           <button class="btn btn-danger btn-xs" (click)="deleteTask(idx)"> Delete </button>
                       </td>
                   </tr>

               </tbody>
               <tfoot>
                   <tr>
                           <button class="btn btn-danger" (click)="clearToDo()">Clear</button>
                   </tr>
               </tfoot>
           </table>
       </div>
   </div>
</div>
And the final code of the component is:
import { Component, TemplateRef, Input, ElementRef } from '@angular/core';

interface Task{
 title: string,
 is_canceled: boolean
}

@Component({
 selector: 'app-root',
 templateUrl: './app.component.html',
 styleUrls: ['./app.component.css']
})
export class AppComponent {
 tasks: Array<Task> = [
   {
     title: "Go home",
     is_canceled: false
   },
   {
     title:"Take a nap",
     is_canceled: false
   },
   {
     title: "Start learning Angular with Sabuj",
     is_canceled: false
   }
 ];

 clearToDo(){
   let do_delete = confirm("Are you sure to delete all tasks?");
   if (do_delete){
     this.tasks.splice(0);
   }
 }

 addTask(input){
   let value = input.value;
   input.value = "";
   this.tasks.push(
     {
       title: value,
       is_canceled: false
     });
 }

 cancelTask(idx: number){
   if (this.tasks[idx].is_canceled){
     this.tasks[idx].is_canceled = false;
   }else{
     this.tasks[idx].is_canceled = true;
   }
 }

 deleteTask(idx: number){
   let do_delete = confirm("Are you sure to delete the task?");
   if (do_delete){
     this.tasks.splice(idx, 1);
   }
 }

 editTask(idx: number){
   let title = this.tasks[idx].title;
   let result = prompt("Edit Task Title", title);
   if (result !== null && result !== ""){
     this.tasks[idx].title = result;
   }
 }
}
Conclusion
Our to-do application now supports adding, editing, deleting, clearing and canceling. Though we have almost completed developing a simple to-do application, still we can add a lot of features to it. In future articles we will try to make improvements and add new features. We have advanced much further in our journey of developing a full featured to-do application with the help of Angular 5. We are solving our problems one by one and also improving them gradually. Keep practicing Angular by improving the do-to application and adding features you want. Whenever you have a question, create an issue on the Github repository Learn Angular with Sabuj and I will try my best to help you.
|
Next article: coming soon! |
About the Author
My name is Md. Sabuj Sarker. I am a Software Engineer, Trainer and Writer. I have over 10 years of experience in software development, web design and development, training, writing and some other cool stuff including few years of experience in mobile application development. I am also an open source contributor. Visit my github repository with username SabujXi.
Recent Stories
Top DiscoverSDK Experts


Compare Products
Select up to three two products to compare by clicking on the compare icon () of each product.
{{compareToolModel.Error}}


{{CommentsModel.TotalCount}} Comments
Your Comment